


An introduction to variables: Part 2 – Speaking to your learners
Picture this: You’ve been using Articulate Storyline for a little while now, you know your way around the basics, maybe you’ve even attended a training course (or two), but you are still not using variables… and if you are, they petrify you! Sound familiar? Have no fear! In this blog I am going to walk you through the steps of creating a text variable (and share a few of my handy tips along the way).
First things first, you need to know the information behind variables, and the difference between system-generated and user-defined variables, so if you haven’t done already, check out our first blog in this series.
Now it’s time to create some variables! Those of us not from a programming background often get overwhelmed with the idea of adding variables to a course, but what you might not have realised is that you have probably been using variables throughout your course without knowing it; if you’ve added a result slide to your course, then you’ve added a variable! Can you believe it?
But in this blog, I’m going to walk you through the steps on using a text variable to personalise a course. We are going to ask the learner to insert their name at the beginning of the course and then recall their name throughout the course – for added personalisation and increased engagement.
Step 1: Getting the learner’s name
To do this, you need to insert a ‘text entry field’ by selecting ‘insert’ on your Storyline ribbon, and then clicking on ‘input’. Select ‘text entry field’ and place it in an appropriate place on your slide.

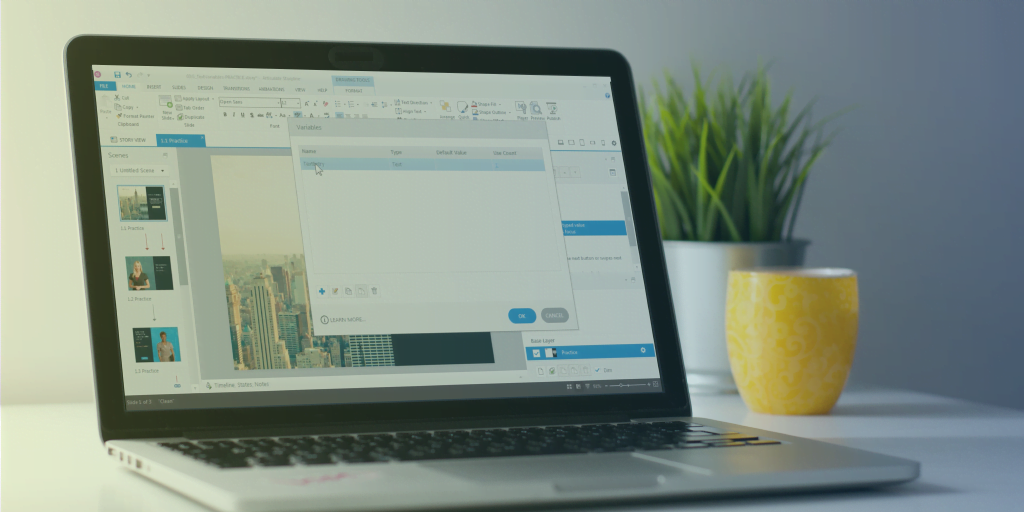
Step 2: Name your variables
The main issue I see with user’s variables not working is that they have not taken the time to name variables in both the timeline and the manage project variables window.
I personally choose to name all variables with the prefix VAR_ to show that this item is a variable, then I open up the manage project variables window and name any variables I have created with VAR_ at the front – this groups them all nicely at the bottom of the window, so I can clearly find variables I have created.
| — Top tip! Always name every item you create in Storyline – from variables to text boxes. It really does help later on. Sometimes Storyline slides can get a bit over-crowded, and if something goes slightly wrong, or you need to tweak your copy, it’s much harder when everything is named ‘TextEntry’. — |
Step 3: Variable value
There isn’t a great deal to do on this step, but it’s definitely worth noting. With text and number variables their value is set when the control loses focus from the input box. You do not need to change this – but what does it mean?
Answer: The focus is where your cursor is flashing – if it is flashing in a text input box, that is where the control is focused. When you click anywhere else on the screen the focus is lost from your input box and this is what sets the value of that variable.
Simple when someone explains it, but I went for a long time not understanding that trigger!
Step 4: Recall your variable
There is little point in including a text variable if we never use it again throughout our course. To recall the text variable content, i.e. your learner’s name, we will need to ‘reference’ the variable. You can do this in two ways:
- Clicking ‘reference’ in the ‘insert’ tab on your Storyline ribbon
- Typing your variable name between two percentage marks, i.e. %VAR_LearnerName%
In the .story view a reference to a variable will still look like this: %VAR_LearnerName%. However, in the preview or published course, it will display whatever the learner has typed in the input box… you have been warned!
| — Top tip! Even if you don’t think you need to recall your variable at this stage – it’s always worthwhile checking now, so that we know we’ve set up our variable correctly. So, create a reference back to your variable – regardless of whether you need to right now or not – to double check your variable is working correctly. — |
Below is an example of how your text variable will look in your .story view, and your published view after your learner has typed their text.

.story view

Published view
| — Top tip! When you are starting out with variables of any type do not copy and paste text or number input boxes unless you know what you are doing! Remember in Storyline, if you copy an object you also copy any states or triggers that are linked to that object. It is the same for variables. If you duplicate or copy a variable input you might not be creating a new instance of a variable, but a reference back to a variable that already exists. Alternatively, you might be updating a variable you do not want to or copying a trigger over that is intended to do something else. — |
Step 5: Creating more triggers
Based on the top tip above, until you get your head round variables, create every input and every trigger from scratch and name as you go. There is nothing worse than having TextEntry32 and not knowing what you wanted it to do (although there are some handy things you can learn if you need to troubleshoot variables… we will pick that up in later blogs too).
So, if you want to insert another text variable, head back to step one and follow each step again – including testing! Never assume because you’ve got it right once, you’ll get it right every time.
The next blog in the ‘introduction to variables’ series will explore what we can do with number variables… but practice first with some simple text examples and make sure you stick to the rules above. Start small and simple and you will be using variables confidently in no time.
—
Did you know we are the only certified training partner of Articulate in the UK? If you want to learn from the best, check out our Articulate training offering here.